Thursday, June 7, 2012

Argh... It's a Pirate Party!


Ahoy Mateys.  The pirates are coming!  For Wyatt's 5th Birthday Party, we decided on a pirate theme.  I  booked his party at a hip local pizza joint that had a large private room perfect to corral 20 kids.  (Besides, I usually need a glass of wine at these things to calm my nerves.) 

For the invitations, I presented them in a message in a bottle.  You can google it and find tons of options, but I used The Original In A Message Bottle Shop and ordered their do it yourself bottles with shells.  I printed the invites on vellum paper because it's easier to roll up.  One tip- roll the paper around a #2 pencil for the perfect size.  Use a piece of twine to hold the roll in place.
 
When the kids arrived at the party my husband and I greeted them in full costume and had them each dress in pirate gear!  We had gold beads, eye patches, sashes, hats and personalized shirts for each child. (I saved the swords until the end to prevent dueling!)  I got the beads, patches, hats and swords from both Birthday Direct and Oriental Trading.  The T-shirts are simple white Hanes from Target.  I cut the neck in a vee and cut both the sleeves and bottom hem to make them look ragged.  I used Iron-On T-shirt transfers from Target to personalize each shirt.


I invited both boys and girls and I wanted the party to suit both so I chose red, pink and black for the theme colors.  Last year, Wyatt had a Batman themed party and one mom, (my nemesis- there's one every year) complained I made Batman costumes for the girls.  She suggested I should have made Wonder Woman for girls like her 6 year old daughter who WASN'T EVEN INVITED, but showed up with her little brother. Anyway, I found super cute plates, napkins and supplies at Birthday Direct...
 

For the cupcakes, I carried over the pink and red theme.  I used my standard Trader Joe's box of cake mix, Wilton's ready-to-use colored fondant and Wilton's FoodWriter.  I used my go-to garlic salt top to cut the circles for the faces from skin colored fondant.  I finished them off with red and pink head scarves and a black food writer for the patch.  I always make a separate "smash" cake for the birthday boy and I used extra fondant for Wyatt's cake.


For entertainment during the party, I had the kids decorate treasure chests from Oriental Trading with pirate stickers, foamies and jewels.  When they were decorated to my satisfaction, I presented them with a bag of gold coins and jewels.  I also hired a "real" pirate entertainer to perform magic tricks and make balloon swords.

As the kids left, I FINALLY let them have the swords and gave them a simple goody bag complete with a treasure map, telescope, stickers and tattoos.  Luckily no one had to walk the plank!


Wednesday, May 23, 2012

End of School Cupcakes. Welcome Summer!

Great cupcakes for End of Year parties


I just dropped off these cupcakes for my son's class party and they were a huge hit!  I've been in New Orleans for 5 days on a girl's trip, so I needed something really low effort. ;) 

First, buy a box of your favorite cupcake mix and bake according to directions on back of box.

For the fondant face, I used yellow Wilton's Ready-to-use Fondant and Wilton's Food Writers.  (I really should buy stock in Wiltons.)   I rolled out the fondant and used the lid of the garlic salt to make the circles- It looked like a good size!
Wow!  Look at that professional set-up.
I made shortening frosting (I use Spectrum Organic Shortening) and dyed it a bright yellow.  With a Wilton's Star Tip to add the little stars, I finished my sunshine face! 

For the tags, I just printed Welcome Summer on cardstock and attached a Beach Ball sticker from the  Jolee's scrap book aisle at Michael's.  (I love/hate that store.)  Tape a toothpick on the back and you have an instant pick.  I've noticed the big baking companies; Wilton's, Martha Stewart, Duff's, have all started their own line of picks to cash in on the idea.  Really, it's way too easy to make.

All Done!  Drop them by the class and take the day off!

Tuesday, May 15, 2012

Chocolate Lego Cupcakes...Oooh la la.

Chocolate Bricks and Minifigures
The chocolates are super easy and people will act like you've discovered the cure for cancer when they see them.  For the Minifigures, I  used a Lego ice cube tray I ordered from the Lego store.  They are also available on Amazon.  For the bricks,  I ordered the Building Blocks Chocolate Mold from Amazon for $1.75.  Just google it- there are lots of choices.


For the chocolate, I use Ambrosia white bark coating melted stove top.  I don't have a double burner, (well maybe I do, but I didn't know what what it was and stuffed it in a drawer), so I just rigged it with two pots.  The bottom pot has about a 1/2 inch of water and I slowly melt the chocolate over medium heat.  If you're child isn't deathly allergic to nuts you can use pre-colored candy melts, but I had to find safe chocolate coloring.  They have chocolate coloring at Michaels, but I try to avoid that place and use the brand at Hobby Lobby.  FYI you can not just bust out the old school food coloring for chocolate.  I don't know the chemistry behind the rule, but I tried it and it was a mess.


Once the chocolate is melted and the color is satisfactory, gently spoon the chocolate to fill the mold cavities.  Make sure you spray a light coat of cooking spray on the molds before adding chocolate!  I carefully wipe around the edges of the mold and gently shake it to make it even.  Place the molds on a flat shelf in the freezer for about 10 minutes.  When the chocolate is back to a solid, gently pop out the candy! 

Finally for the cupcakes, once again start with my tried and true cupcake recipe...A box of Trader Joe's Cupcake Mix, (Betty Crocker, Duncan Hines or even store brands may be substituted.)   After baked and frosted, gently push a chocolate Lego into the frosting and you are all done!

Monday, May 14, 2012

Oh, Crap! I have to make a dessert for preschool graduation...

 Graduation Cupcakes
So, I love last minute notices to bring in baked items!  For Wyatt's preschool, I had to make a dessert item for the end of year class get together.  When it comes to class parties I definitely like the most "bang for the buck".  For these cupcakes, I used Trader Joe's chocolate cupcake mix with a quick shortening frosting.  (I use Spectrum Organic shortening instead of the death in a can...Crisco.)  For the fondant diplomas and hats, I used pre-colored Wilton's fondant.  I hate that it's full of chemicals, but hey I'm not a baker.  I actually have to search the shelves at Michaels to find the boxes manufactured in the United Kingdom.  Those are nut free and I stock up on them when I find them. Anyway, for the diplomas, I just cut the fondant into strips and rolled them up like a scroll.  I used another bit of fondant to make a tie.  The hats were simple blue square with a white fondant tie.  Oila!  Graduation cupcakes that made me look like a rock star!

Sunday, May 13, 2012

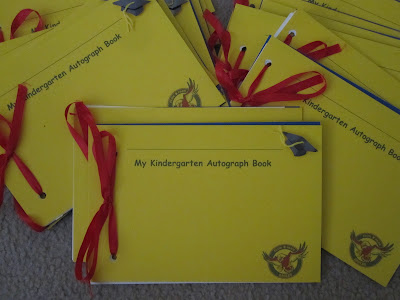
Autograph Books for End of School Party!

 Kindergarten Autograph Book

For Cole's Kindergarten graduation, I made all the kids an autograph book to pass around at then end of year party.  It was so simple and the kids LOVED it!  They had a blast running around the class getting all their friends to sign it.  It was actually a last minute idea in case we had some extra time during the party.  The kids had so much fun, we ended up scrapping plans for the other games.  The teacher told me the kids brought them in the next day and continued filling the pages.

I made them in the school's colors of yellow, red and blue.  For the cover, I used yellow card stock and printed a school logo and name line. I then added a graduation cap embellishment.  I cut white card stock for the inside pages and to bind the book I just used a whole punch and red ribbon.  Like I said, E-A-S-Y. 

Friday, April 27, 2012

Thanks for helping us grow...Thinking beyond the gift card.

Seed Packets for a Teacher's Gift
I always get our teachers a gift card.  (Honestly, it's what I wish everyone would buy me. Hint. Hint.)    However, I do think it's nice to add a personal touch to the gift and the children enjoy the exchange.  Let's be serious, when children are younger they do not understand how something like macaroni artwork is not considered 100 gazillion times cooler then a rectangular piece of plastic.  A new idea I had this year was a "Thanks for Helping us Grow" end of year gift.  If you collect money from the class, spend the bulk of the money on a Visa type gift card that you label- For your Gardening Supplies.   With about $10-$15 buy a  garden planter or pot.  Then ask students to bring in a variety of seed packs with a personal note, quote or card with the title...Thanks for helping me grow.  Plan for the kids to bring in their surprise contribution on the same morning, maybe the day of the class party.  That morning, send in the planter and gift card with a note, For your Collection! 

Tuesday, April 24, 2012

Teacher's Class Cookbook

Surprise the teacher with a collection of class favorites!
Last year, as part as the end of the year teacher gifts, I asked the parents (several times) to e-mail me a copy of their favorite summertime recipe.  I compiled the recipes in a three ring 1/2 inch  binder and presented the teacher and assistant teacher a copy the day of the "end of year" party.  (In retrospect, I probably would not have given one to the assistant teacher as she floated between 3 classes and mostly just scowled at everyone .)   The cookbooks are a great way to have families contribute to a gift without sending any money.  I had amazing participation and everyone loved the final product.  Some tips-
Our Recipe
  • Edit the recipes so the fonts and titles match
  • Include a picture on each recipe re-sized to be the same size.  If one was not included, I just googled the recipes and added my own!
  • I printed each recipe on a cream card stock and then cut each recipe to mount with double sticky tape on a decorative card stock.  I found a fabulous value pack of toile, striped and patterned cream and black card stock at Michaels. (Don't forget you can almost always download a Michaels 40% off coupon onto your smart phone.)
  • I laminated each recipe with Avery laminating sheets.  If you don't want to to do this step, I recommend placing each recipe in a top closing page protector.
  • I decorated the cover page with summer grilling type scrapbook embellishments from Jolee's Boutique.

Monday, April 23, 2012

End of Year Teacher Gifts- BBQ Buckets

The kids loved surprising the teacher with BBQ supplies to fill the bucket!

I cannot believe another school year is coming to a close!  It's time to start thinking about how to celebrate all the hard work of those wonderful teachers with end-of-year gifts.  (If you didn't like your kids teacher just skip this post.)  As a class mom  at various schools and preschools, I've had to become extra clever in getting around all those pesky "rules" regarding gift-giving.  I even told the teachers this year I may retire from class mom duties just so I don't have to follow the guidelines for room moms.  For instance, at my younger son's preschool, they have a NO goody bag at "class celebrations" policy!  Shouldn't you tell a girl this before she signs up.  (This year I just made my creations in non-bag form and handed them out the day before the parties.)  Anyway, creative class gifts are harder in some schools especially ones that do not allow cash donations.   Last year, for my son's kindergarten class, I bought nice beverage buckets and asked each family to contribute a BBQ themed gift.  I suggested everything from aprons, sauces, grilling tools, spice rubs, grilling mitts, etc. to bring in to school the day of graduation.  Almost every child participated and the teachers loved all their summertime goodies.  I even included a fabulous cook book that I'll talk about soon!  If you are allowed to accept cash, you could include 3 gift cards; one for the BBQ accessories (Target), one for the grilling food (grocery store) and a final one to their favorite restaurant (in case it rains).

The Perfect Cookie

Ribbitt!  Wyatt's Frog Themed 1st Birthday
I always believe that a party's success lies in the attention to details.  It's easy to make a batch of cookies, so why not order a cookie cutter matching your theme and take it to that next level.  A lot of  impact with a little effort!

After many trials and errors, OK basically store bought dough doesn't work, I found the perfect sugar cookie recipe that will produce a flawlessly shaped cut-out.  (I think I ripped it out of a magazine in a doctor's waiting room- sorry!)   This was before the days of online pin-boards and Facebook, so I still have my much loved original copy that's been getting  a little wrinkled and sticky over the years.  I must have used this recipe a dozen or so times and the cookies always turn out great and get plenty of compliments.


My Favorite Sugar Cookie Dough
Ingredients
  • 1 cup unsalted butter, softened
  • 3/4 cup sugar
  • 1 large egg
  • 1 teaspoon vanilla extract
  • 1/4 teaspoon salt
  • 2 1/2 cups flour
1. Using an electric mixer at medium high speed, cream the butter gradually adding the sugar.  Beat in the egg until evenly mixed, then blend in the vanilla extract and salt. (I add coloring here)

2. With a wooden spoon, stir the flour into the creamed ingredients, about one third at a time, until evenly blended.  The dough may seem soft, but it will firm up when refrigerated.

3.  Divide the dough in half, flatten each portion into a disk and seal in plastic wrap.  Refrigerate overnight.

4.  Heat oven to 375 degrees.  Cover cookie sheet with foil and lightly spray with cooking spray.  Roll dough between 2 sheets of lightly dusted wax paper to a 1/4 inch thickness.  Cut out shapes and gently transfer to baking sheet.

5.  Bake 8-10 minutes until cookies start to turn golden brown along the edges. Cool.  Makes 30-40

  • Notes- Dumping sugar works just as well as "gradually adding".  I didn't own a wooden spoon for the 1st three years and freezing  for an hour or two is quicker than refrigerating overnight.   I did find it's easier to work in small batches.  The warm dough gets tricky to cut!
Rock On!  Cole's 4th Birthday

Under The Sea.  Cole's 1st Birthday

All Aboard.  Cole's 2nd Birthday